# Intro to Supercomputing 25 - Duke IEEE
This free two day workshop aims to empower the Duke community by enhancing faculty and student knowledge of high-performance computing (HPC) resources. The event includes a series of tutorials tailored to faculty on efficiently using NSF funded compute via the ACCESS program, high performance computing basic and approaches to running AI on scientific compute. We want you to leave knowing how to take local code and have it run in a supercompute enabled environment. The goal is to broaden access to HPC resources, support research, and foster innovative projects in computational research, ultimately bridging the gap between advanced computing technologies and academic research needs.
The ideal audience is faculty and students looking to move from running simulations and llm research locally to NSF sponsored supercomputers or anyone looking for an introduction to high performance computing.
The NSF ACCESS program is gives researchers, faculty and grad student Duke access to high performance compute, gpu enabled virtual machines, and storage clusters at no cost.
## In person workshop - Duke University
## Saturday April 5th 9:30am - 5:00pm
## Sunday April 6th 10:00am - 4:00pm
## [REGISTER HERE](https://partiful.com/e/jpbdvQPqfYNcfXDbi8Mt)
## Schedule:
{% content-ref url="/pages/wf1O7rbJl2rKB8gAvldm" %}
[Schedule](/schedule)
{% endcontent-ref %}
###
### Sponsors
[National Science Foundation - ACCESS Program](https://access-ci.org/)
[Duke IEEE Student Chapter](https://duke.campusgroups.com/IEEE/club_signup)
[Delta Lambda HKN Chapter](https://hkn.ieee.org/hkn-chapters/all-chapters/delta-lambda-chapter)
Delta Lambda Chapter
## Organization Committee
Duke Institute of Electrical and Electronics Engineers Student Chapter
**
Sanjeev Chauhan: ML researcher and HPC devops at SLAC National lab, President Duke IEEE
**
# Schedule
All events and food are free. Track A is a beginner focused track while Track B follows a more advanced track. Feel free to move between rooms freely.
## [REGISTER HERE](https://partiful.com/e/jpbdvQPqfYNcfXDbi8Mt)
### Location: Wilkinson building, 534 Research Dr, Durham, NC 27705
### Day 1: Saturday, April 5th
| Time | Event | Location |
| ------------------- | ----------------------------------------------------------------------------------------------------------------------------------------------------------------------------------- | --------------- |
| 9:30 AM - 10:00 AM | Check in and **Breakfast** - Breakfast Burritos, English Muffins | Wilkinson 021 |
| 10:00 AM - 11:00 AM | [ **Opening Remarks and Overview of ACCESS,**](/workshops/quickstart) **How to request usage of compute. ft.** [**Jetstream 2**](/workshops/jetstream-2-tutorial) | Wilkinson 021 |
| 11:00 AM - 11:45 AM | Track A:[ **Introduction to Supercomputing Architecture, Linux and job scheduling (SLURM)**](/workshops/introduction-to-supercomputing-architecture-linux-and-job-scheduling-slurm) | Wilkinson 021 |
| 11:45 AM - 12:30 PM | Track B:[ **Localized RAG model with basic LLM**](/workshops/rag-tutorial) | Wilkinson 021 |
| 12:30 PM - 1:30 PM | Lunch - Bqq / mac and cheese boxes - by Its a Southern Thing | Wilkinson 126 |
| 1:30 PM - 3:00 PM |
| Wilkinson 021 |
| 3:00PM - 3:40 PM | Networking Time / Tour of Duke Datacenter ft. Dr. Bletsch | Wilkinson Lobby |
### Day 2: Sunday, April 6th
| Time | Event | Location |
| ------------------- | -------------------------------------------------------------------------------------------------------------------------------------------------- | --------------- |
| 10:00 AM - 11:00 AM | Breakfast: RISE Biscuits | Wilkinson 021 |
| 11:00 AM - 11:45 AM |
Track B: A superintelligent future: Foundation Models, Agents and the Economy of Tomorrow - Harry Fazzone
| Wilkinson 021 |
| 11:45 AM - 12:30 PM |
Track A: DASK- python based distributed computing framework for HPC
| Wilkinson 021 |
| 12:30 PM - 1:30 PM | Lunch - Redstart Foods | Wilkinson Lobby |
| 1:30 PM - 3:00 PM | Basic Parallelism & MPI - ft. [Rebecca Hartman-Baker, PhD (NERSC)](https://www.nersc.gov/about/nersc-staff/user-engagement/rebecca-hartman-baker/) | Wilkinson 021 |
| 3:00 PM - 4:00 PM | Closing talk - Capt. Grace Hopper on Future Possibilities: Data, Hardware, Software, and People (Part One, 1982), recently declassified by the NSA | Wilkinson 021 |
\
Questions comments and concerns can be sent to
# Join Duke IEEE Emails
Join on Duke Groups:
{% embed url="" %}
email:
# Food Menu
**Day 1:**
* **Breakfast**: *Redstart Foods* –Coffee, Junior English Muffin Spread, Breakfast Burritos
* **General Lunch**: *It's a Southern Thing* – Pulled Pork / Mac and Cheese Box Lunches, Banana Pudding, Sides, Sweet Tea and Water
**Day 2:**
* **Breakfast: Rise Biscuits,** bacon egg cheese biscuits, vegetarian option, orange juice, cinnamon rolls etc.
* **Lunch**: *Redstart Foods* – Spare Ribs, Herb Chicken, Cheddar Pasta, Vegetarian Flatbread, Focaccia, Sweet Potatoes, Spiced Pork Shoulder, Chips and Dip, Braised Meatballs, Kale Salad
# Duke ECE Faculty X Student lunch
An opportunity for students to get to know their ECE Faculty better.
📅 **Date:** April 5th | ⏰ **Time:** 12:30 – 1:30 PM | 📍 **Location:** on campus
Join Duke IEEE (Institute of Electrical and Electronics Engineers) for a casual lunch with ECE faculty! This is a great chance to meet your professors outside the classroom, ask questions, and learn more about their research and career paths.
### Menu
{% file src="/files/q6w8WHkWgJeMadluOy6X" %}
## Students Apply Here
{% embed url="" %}
Space is limited—RSVP now to reserve your spot!
## Faculty RSVP Here
{% embed url="" %}
# Submit a Workshop
{% embed url="" %}
# RAG Tutorial
This is a tutorial on how to set up an open-source, fully customizable RAG Chatbot that can answer questions about any documents you choose. This could be useful for many applications - for example, it could answer technical questions for new members of a research lab, pulling from the lab's funding/research design application documents, or answer questions about a class or subject, pulling from a textbook.
**This tutorial is meant for people with little to no experience with HPCs or Coding. If you are experienced and want to skip the explanations, feel free to jump right to the** [**Quickstart**](#quickstart)
### Why Use a Localized RAG Chatbot?
This type of chatbot offers a variety of advantages over a SaaS solution like ChatGPT, including:
* **Data Privacy:** Keeps sensitive documents (e.g., research, technical papers) secure within your own system.
* **Vector Storage and Retrieval:** The vector storage aspect of this chatbot allows it to answer very specific and detailed questions based on documents you provide, instead of pulling from the entirety of its training information to hopefully answer a question correctly.
* **Customization:** You can modify the prompts and logic flow of this bot to tailor responses to specific datasets or specialized fields.
* **No External Limitations:** Bypasses restrictions imposed by cloud services (e.g., content moderation).
* **High-Security Applications:** Ideal for research labs or industries with strict confidentiality needs.
## Step 1: Provision HPC Resources
Of course, you will need some compute resources to run this chatbot on. ACCESS Compute is a great candidate for a problem like this because of its accessibility and ease of use - you can pick from a large variety of University-run HPC programs, and easily provision the resources you need from anywhere in the world!
This tutorial uses Jetstream 2, but any major ACCESS HPC should work.
### Jetstream 2 Provision
Log in to [Jetstream 2 Exosphere ](https://jetstream2.exosphere.app/exosphere/)and provision a new Instance. The m3.medium configuration should suffice for this project.
Jetstream 2 Exosphere Instance Configuration (The white bar at the bottom is a graphics bug, all settings are the default)
Select the m3.medium Instance configuration, leave all other settings as the default, and click the Create button at the bottom.
Back on your Instances page, you should see your instance building and starting up, and after about a minute it should look like this:
RAG Chatbot Instance
Click Connect to -> Web Shell and continue on to the next step.
## Step 2: Chatbot Setup
The code for this chatbot uses Llamafile to host the LLM and Embedding models, and a FAISS Vector store as a vector database. It is a modified version of a [llamafile rag example](https://github.com/Mozilla-Ocho/llamafile-rag-example) published by Mozilla with some improvements[^1] for ease of use.
#### First, clone the GitHub repository to your Instance:
```bash
git clone https://github.com/Meeeee6623/containerized-llamafile-rag-example.git
cd containerized-llamafile-rag-example
```
Then, run the setup script
```bash
./setup.sh
```
This should set up a python virtual environment and install the required packages:
Then, it should download the required embedding and generation model files:
Next, we need to give the model some documents we want it to reference when we talk to it. You can upload anything you want, and for this example I will use [the informational PDF on SLAC National Laboratory's FACET-II Department](https://www6.slac.stanford.edu/sites/default/files/2022-11/facet-II_factsheet_11_2022_final.pdf), which should be a good demonstration on how vector search can help a chatbot respond to questions it would normally not know the answer to.
To do this, I move into the `local_data` directory and download the pdf with wget:
```bash
cd local_data
wget https://www6.slac.stanford.edu/sites/default/files/2022-11/facet-II_factsheet_11_2022_final.pdf
cd ..
```
And that's it! You are now ready to use your chatbot. Start it with the `app.sh` script and enjoy:
```bash
./app.sh
```
It should take around 40 seconds for the llamafile servers to start up, then you will be greeted with a prompt in the terminal:
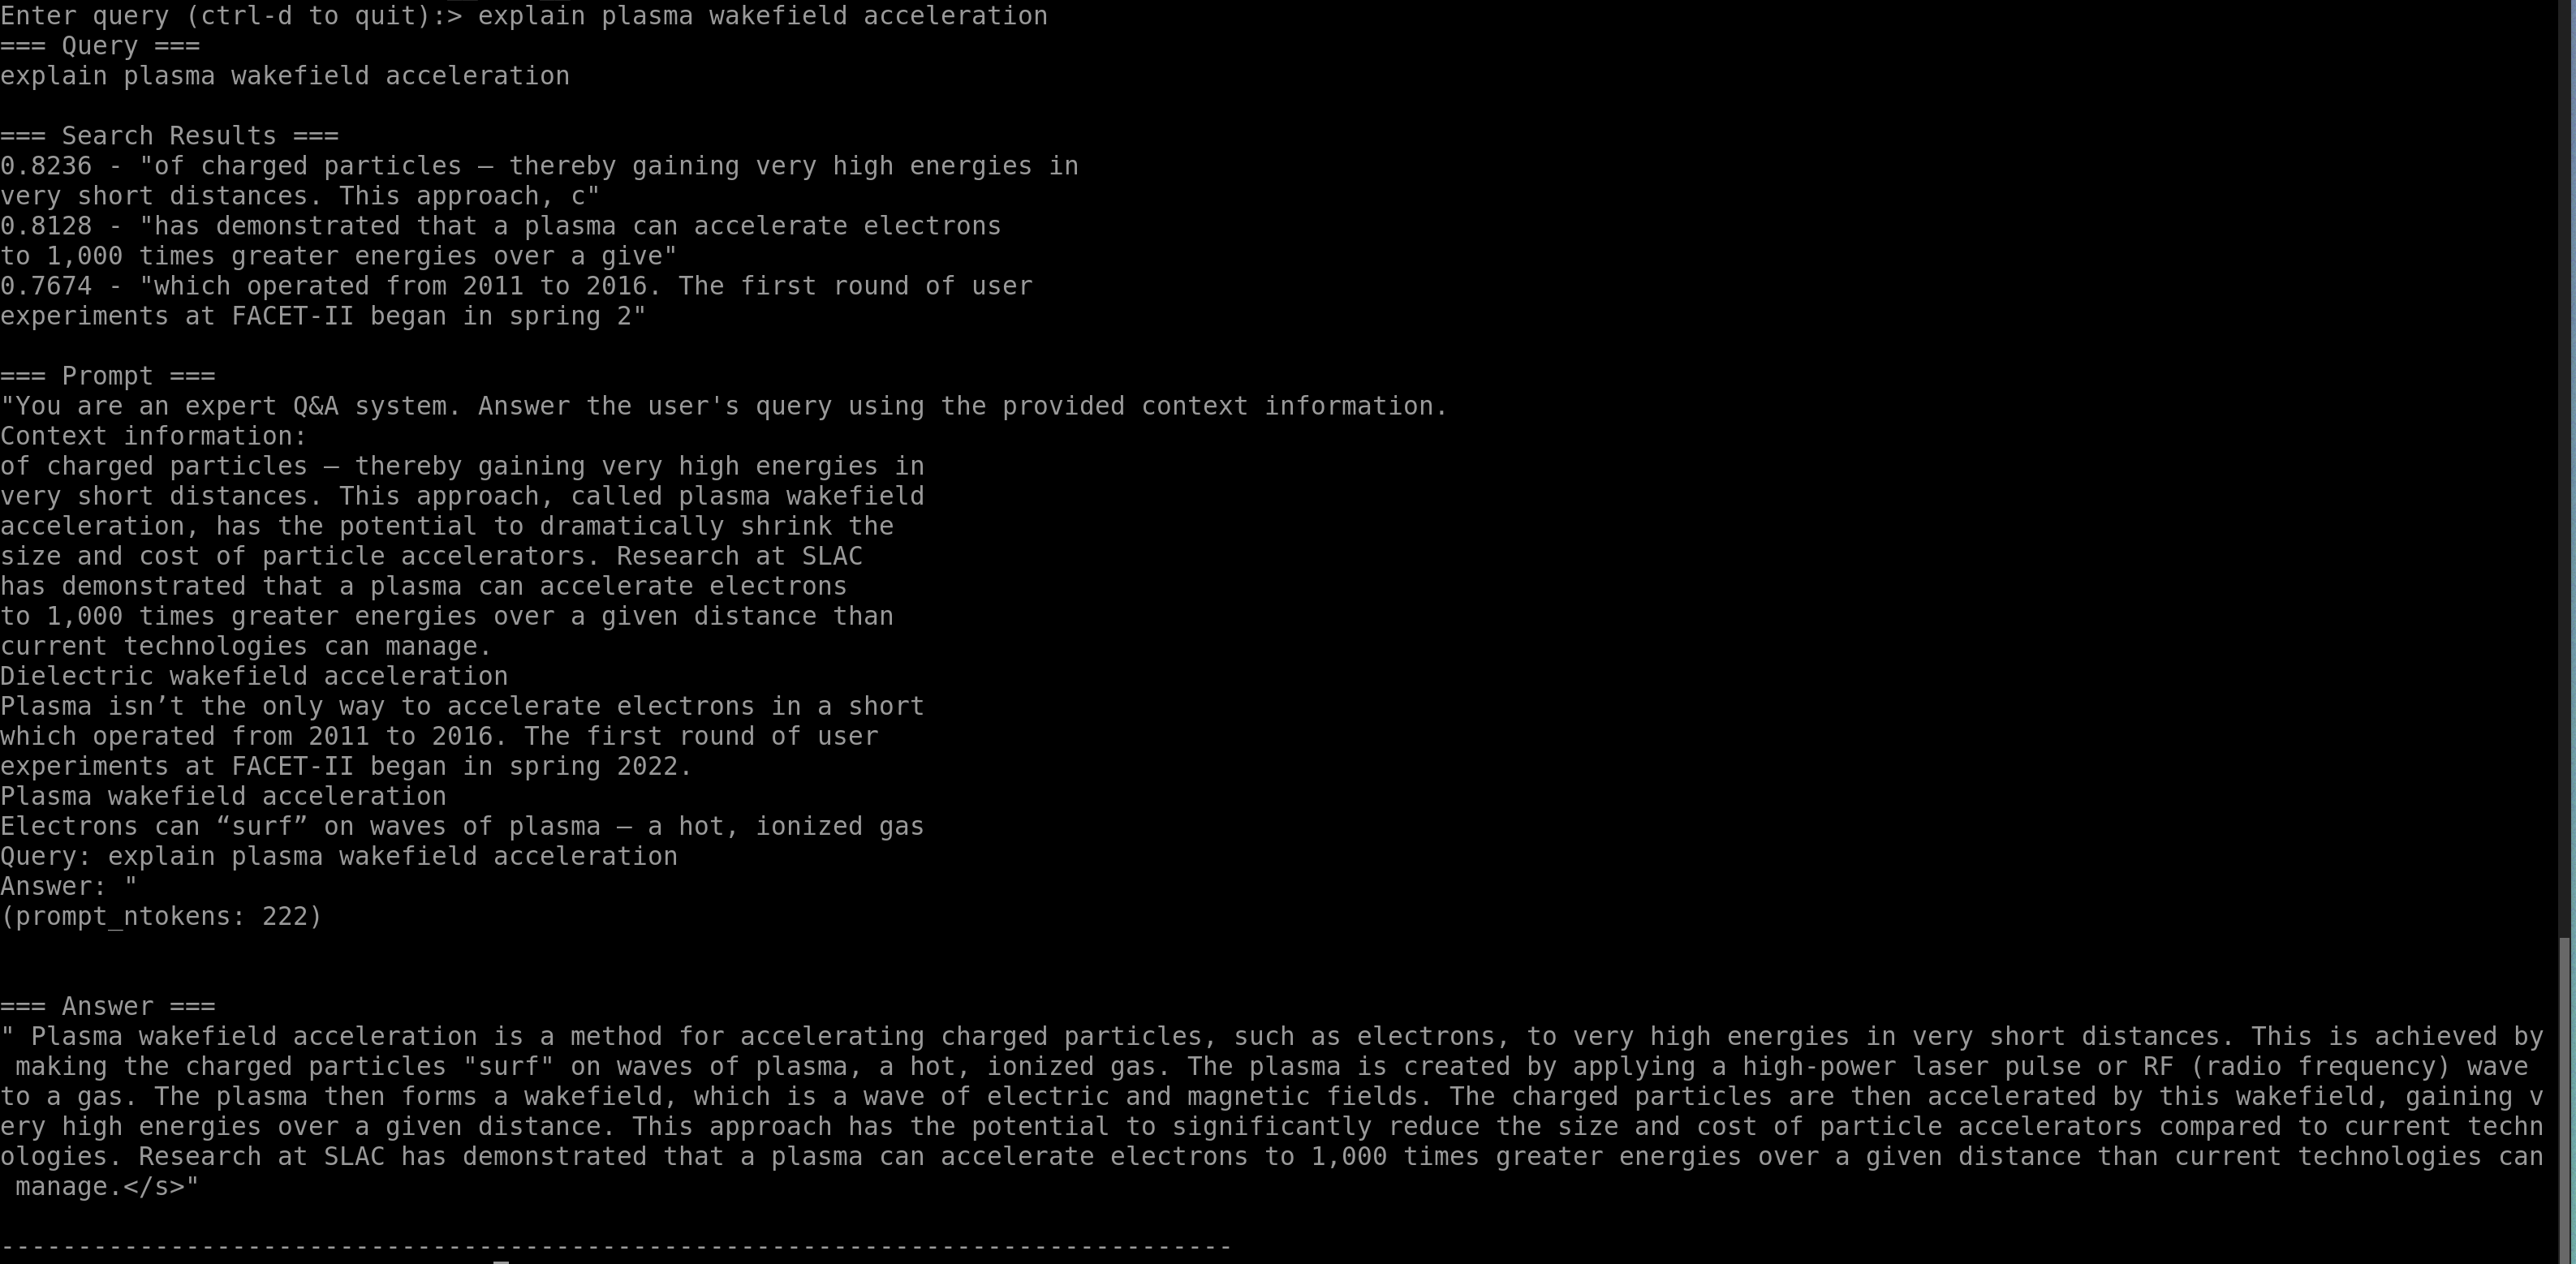
Let's ask it about something specific to FACET-II, like plasma wakefield acceleration:
You'll see the chunks that the vector search process returns, as well as the full prompt that is given to the chatbot, along with the chatbot's response at the bottom. In this case, the chatbot responded succintly summarizing the plasma wakefield technology used in FACET-II, along with the analogy of particles "surfing" on a wave.
> Plasma wakefield acceleration is a method for accelerating charged particles, such as electrons, to very high energies in very short distances. This is achieved by making the charged particles "surf" on waves of plasma, a hot, ionized gas. The plasma is created by applying a high-power laser pulse or RF (radio frequency) wave to a gas. The plasma then forms a wakefield, which is a wave of electric and magnetic fields. The charged particles are then accelerated by this wakefield, gaining v ery high energies over a given distance. This approach has the potential to significantly reduce the size and cost of particle accelerators compared to current technologies. Research at SLAC has demonstrated that a plasma can accelerate electrons to 1,000 times greater energies over a given distance than current technologies can manage.
## Using the chatbot
Now that the chatbot is up an running, feel free to play around with it and modify it to your specific requirements. Anytime you update the local\_data directory, the app.sh script will detect it when the chatbot starts and re-build the vector store with the new information. If you want to change the prompt the chatbot uses, it can be found on line 171 of app.py.
## Quickstart
If you already have experience with coding and/or HPCs, here's all the steps you need to get up and running in one place on your machine:
1. Clone the github repo & setup
```bash
git clone https://github.com/Meeeee6623/containerized-llamafile-rag-example.git
cd containerized-llamafile-rag-example
./setup.sh
```
2. Add your data to `local_data`
```bash
cd local_data
# replace with any files you want
wget https://www6.slac.stanford.edu/sites/default/files/2022-11/facet-II_factsheet_11_2022_final.pdf
cd ..
```
3. Run the chatbot
```bash
./app.sh
```
That's it! It really is that easy!
## Troubleshooting
If you're running into any issues, feel free to make an Issue on the GitHub repository or send me an email at and I'd love to help you out!
Some common issues you might run into:
If you're running this on your own machine or a smaller instance, you might run out of storage or RAM when downloading and running these models. Make sure you have enough space on your machine, and if you can't free up enough space for these models, consider replacing the models with smaller ones in `setup.sh` (This is why I recommend using an ACCESS HPC)
If the llamafile servers are not running properly, you might have some port conflicts with the llamafile servers. Consider changing the ports in your .env file to ports that are currently free on your local system.
[^1]: * Automatically updates vector store when documents are updated
* No longer breaks when no chunks are found
* Can parse PDF documents, not just plain text
* Uses the newer
# Finetunning AI in containers on HPC
# ACCESS INTRO: NSF Computing Resources Overview
How to access NSF computing resources.
{% hint style="warning" %}
Requires a Duke NetID
{% endhint %}
Slides:
{% embed url="" %}
{% embed url="" %}
ACCESS (Advanced Cyberinfrastructure Coordination Ecosystem: Services & Support) is a program funded by the National Science Foundation (NSF) that provides researchers and educators with access to advanced computing, data analysis, and storage resources. It offers a variety of computing systems, such as GPUs, large-memory nodes, and storage, to support a wide range of research and educational needs. Users can apply for an allocation, which grants them project-specific resource units to utilize these resources for their research or classroom projects, without needing an NSF award.
## Available Compute
{% embed url="" %}
ACCESS provides various HPC resources, including:
* **SLURM based HPC**: A workload manager for scheduling and managing compute jobs.
* **Virtual Machines**: Flexible environments for custom configurations.
* **GPU Compute**: High-performance graphics processing units for parallel computing tasks.
* **Large Memory Nodes**: Systems designed for memory-intensive applications.
* **Cloud Computing**: Virtual resources for scalable computing.
* **Tape Storage**: Long-term archival storage for large datasets.
* **Specialized Hardware**: Unique architectures like the Cerebras Wafer Scale Engine (largest chip ever built) for AI acceleration.
## Who is Elgible
{% embed url="" %}
### Recommended Resources
#### Jetstream 2 GPU:
Jetstream2 GPU is a hybrid-cloud platform that provides flexible, on-demand, virtual machines with preloaded software and root admin access. This particular portion of the resource is allocated separately from the primary resource and contains 360 NVIDIA A100 GPUs -- 4 GPUs per node, 128 AMD Milan cores, and 512gb RAM connected by 100gbps ethernet to the spine. (ACCESS Website)
## How to login
1. Go to the login portal -
2. Select Duke as login provider and login with NetID
## Review project types:
## Request Resources
User can either request access to Duke's Campus Champion allocation or request an individual project.
#### Duke Campus Champion allocation
The Campus Champion allocation is designed to provide instant access to compute for the Duke community. To request access email and cc
#### Requesting a project
Once logged in, head to the my project page and request a new project.
# Jetstream 2 tutorial
How to get a gpu powered virtual machine vis NSF's ACCESS Program
{% hint style="warning" %}
Requires a Duke NetID and registration with the Duke Campus Champions allocation. Registration for the Intro to Supercomputing workshop will automatically give you access to the allocation.
{% endhint %}
## Jetstream 2
Jetstream2 is a cloud-based infrastructure designed to support research, education, and scientific computing. It provides virtual machines and storage resources, allowing users to easily access and manage customized computing environments for a wide range of applications. Jetstream2 is particularly useful for those who need flexible and scalable computing resources without the complexity of traditional high-performance computing (HPC) systems. It supports projects in various fields such as data analysis, modeling, and research collaboration, making advanced computing more accessible to the academic community.
## login to Jetstream
Go to
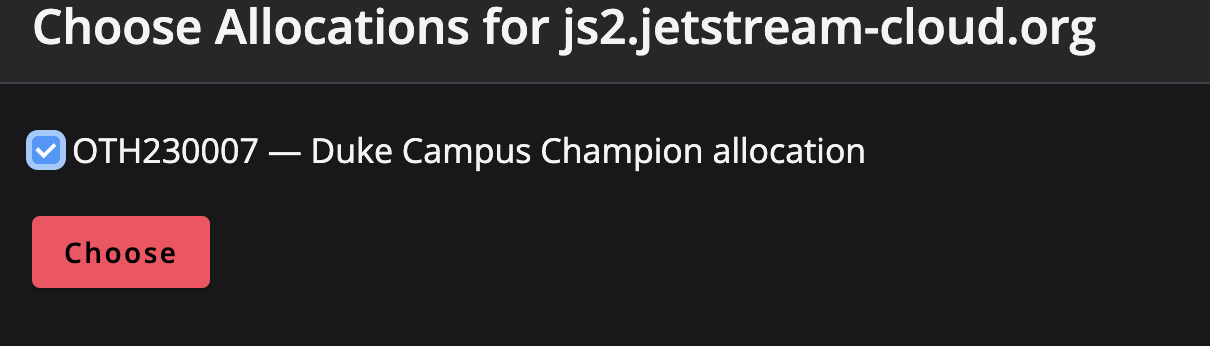
click add allocation
click add ACCESS account
select Duke as the provider
Registering for the intro to supercomputing workshop should have added you to the Duke Campus Champion allocation. Email if you are not part of it.
Create a new instance, add a name, pick ubuntu 22.04 and pick the smallest parameters as shown below.
Wait for your instance to build and then click connect to and web terminal to connect to it.
## Launching Jupyter on Jetstream2
**Using Web Desktop in Exosphere**
For a seamless experience with Jupyter notebooks on Jetstream2, initiate an instance through Exosphere, ensuring the web desktop option is activated.
1. Start an instance and wait for allocation.
2. Launch a web terminal or ssh into the machine.
**Accessing Jupyter through Web Shell or SSH Session**
Given that a virtual machine is generally unaware of its public IP, Jetstream2 provides a script that retrieves your VM’s IP and integrates it into the URL provided by Jupyter.
To remotely initiate Jupyter via web shell or SSH:
1. Input the commands:
```bash
module load anaconda
jupyter-ip.sh
```
2. You should observe an output concluding with details resembling:
```
To access the notebook, open this file in a browser:
file:///home/exouser/.local/share/jupyter/runtime/nbserver-100997-open.html
Or utilize one of these URLs:
http://neatly-trusting-chow-gui:8888/?token=723fa5a01f6dc27b0ec655846572513757e921aaf247cbb7
or http://149.165.154.8:8888/?token=723fa5a01f6dc27b0ec655846572513757e921aaf247cbb7
```
3. The final URL with the IP address (e.g., `149.165.xxx.xxx`) is the link you'll require for your browser.
#### Managing and Accessing Instances
**SSH Access to the virtual machine**
To SSH into an Exosphere instance:
1. Obtain the public IP address of your instance from the Exosphere dashboard.
2. Use your terminal or SSH client with the command:
```bash
ssh [username]@[instance_IP_address]
```
**Using the Virtual Desktop**
Exosphere provides a virtual desktop option for a more interactive experience. To utilize the virtual desktop:
1. Navigate to your Exosphere dashboard.
2. Select your active instance and click on the "Web Desktop" option.
3. This will open a new window with a full desktop environment accessible via your browser.
**Managing Instance Credits**
To optimize your ACCESS credits:
* **Shelving:** When not using an instance, you can "shelve" it. This action temporarily suspends the instance, preserving its state but not consuming credits.
* **Resizing:** Exosphere allows resizing of instances based on your needs. If you require more or fewer resources, navigate to the instance settings and select a different size. This flexibility ensures you only consume credits based on your actual resource requirements.
# Introduction to Supercomputing Architecture, Linux and job scheduling (SLURM)
Intro to Supercomputing Architechture:\
Slides:
-------
\*Just section II\*
{% file src="/files/4CkAaXcw2y9GCyCcx6TD" %}
Rebecca Hartman-Baker, PhD User Engagement Group Lead Charles Lively III, PhD Science Engagement Engineer Helen He, PhD User Engagement Group June 28, 2024
{% endfile %}
### Introduction to SLURM: Theory and Usage
#### What is SLURM?
SLURM (Simple Linux Utility for Resource Management) is a widely-used open-source workload manager designed to efficiently allocate computing resources on High-Performance Computing (HPC) clusters. It manages how computational jobs are scheduled, executed, and monitored across the cluster.
#### How SLURM Works
SLURM operates based on the following key concepts:
* **Nodes**: Individual computers within a cluster, each with multiple CPUs or GPUs.
* **Partitions**: Logical groups of nodes configured by administrators, typically organized by node capability or job duration.
* **Jobs**: Tasks or programs submitted by users to be executed on the cluster.
* **Scheduler**: The core component of SLURM, responsible for managing resources and scheduling jobs based on priority, availability, and job requirements.
When a user submits a job, SLURM places it into a queue. The scheduler prioritizes and allocates resources to jobs based on user requests, resource availability, and cluster policies. Once resources become available, the scheduler assigns the necessary nodes and executes the job automatically.
#### Submitting Jobs to SLURM
To submit jobs to SLURM, users typically write a simple batch script and then submit it using the `sbatch` command.
Here's a basic example of a SLURM batch script:
```bash
#!/bin/bash
#SBATCH --job-name=my_first_job
#SBATCH --output=output.txt
#SBATCH --error=error.txt
#SBATCH --time=01:00:00
#SBATCH --partition=standard
#SBATCH --nodes=1
#SBATCH --ntasks=1
# Load modules if necessary
module load python
# Run your program or command
python myscript.py
```
* `--job-name`: Specifies the name of your job.
* `--output` and `--error`: Files to save the standard output and error messages.
* `--time`: Requested maximum runtime of the job (format HH:MM:SS).
* `--partition`: Partition (group of nodes) your job should run on.
* `--nodes`: Number of nodes required.
* `--ntasks`: Number of parallel tasks (typically equal to the number of processes you want to run).
#### Useful SLURM Commands
* `sbatch myscript.sh`: Submits a job script.
* `squeue`: Lists jobs currently in the queue.
* `scancel `: Cancels a job based on its Job ID.
* `sinfo`: Displays information about partitions and node availability.
#### Checking Job Status
You can monitor your job status with:
```bash
squeue -u
```
This will show all your current jobs and their status (pending, running, etc.).
#### Canceling Jobs
If you need to cancel a job, use:
```bash
scancel
```
Replace `` with the actual ID of the job you want to cancel.
### Key SLURM Commands
| Command | Purpose |
| --------- | ------------------------------------ |
| `sinfo` | View available resources |
| `squeue` | See running/pending jobs |
| `sbatch` | Submit a batch job |
| `srun` | Launch a job step or interactive job |
| `scancel` | Cancel a running job |
| `sacct` | View accounting/history (if enabled) |
***
***
## Try it out on TAMU FASTER
{% hint style="info" %}
Needs an ACCESS Account and a TAMU account from ACCESS
{% endhint %}
Guide from
**Authorized ACCESS users can log in using the Web Portal:**
{% embed url="" %}
### Compose a job using Drona Composer
Click on Drona Composer
Setup your SLURM job using the GUI.
job name: ship\_fractal
location: leave as is
Environments: Generic
Upload files: select file, add the ship.py file uploading from your local machine as below.
Sample job code:
Make a file on your local machine called ship.py . This is a sample script that we will run on the HPC.
````python
# ship.py
import numpy as np
import matplotlib.pyplot as plt
# Set image resolution
width, height = 1000, 1000
max_iter = 256
# Define viewing window in complex plane
xmin, xmax = -2.0, 1.5
ymin, ymax = -2.0, 0.5
# Generate complex grid
x = np.linspace(xmin, xmax, width)
y = np.linspace(ymin, ymax, height)
X, Y = np.meshgrid(x, y)
C = X + 1j * Y
# Initialize fractal iteration array
Z = np.zeros_like(C)
img = np.zeros(C.shape, dtype=int)
# Compute Burning Ship fractal
for i in range(max_iter):
Z = (np.abs(Z.real) + 1j * np.abs(Z.imag))**2 + C
mask = (img == 0) & (np.abs(Z) > 2)
img[mask] = i
# Plot and save the result
plt.figure(figsize=(10, 10))
plt.imshow(img, cmap='hot', extent=(xmin, xmax, ymin, ymax))
plt.axis('off')
plt.tight_layout()
plt.savefig("burning_ship.png", dpi=300, bbox_inches='tight')
```
````
Number of Tasks: 1
No Accelerator
Total memory: 40GB
Expected Run Time: 10 Minutes
Project Account: Default one
### Click Preview and then and the follow code to below where it says ADD YOUR COMMANDS BELOW
Your template.txt should look like below:
```
#!/bin/bash
#SBATCH --job-name=ship
#SBATCH --time=1:0:00 --mem=2G
#SBATCH --ntasks=1 --nodes=1 --cpus-per-task=1
#SBATCH --output=out.%j --error=error.%j
#SBATCH --account=145332967756
module purge
module load WebProxy
cd /scratch/user/u.sc126842/drona_composer/runs/ship
# ADD YOUR COMMANDS BELOW
module load GCC/13.3.0 GCC/9.3.0  CUDA/11.0.2  OpenMPI/4.0.3  GCC/9.3.0  OpenMPI/4.0.3 iccifort/2020.1.217  impi/2019.7.217
module load  SciPy-bundle/2020.03-Python-3.8.2 matplotlib/3.2.1-Python-3.8.2
python ship.py
```
Click submit.
Go back to main dashboard, jobs, Active Jobs to view the job and file output.
If you job completes then go: dashboard, files, scratch, and a path like this to find the job
```
/scratch/user/u.sc126842/drona_composer/runs/ship
```
# ACCESS PEGASUS
{% embed url="" %}
# Containers for HPC
How to package local code in a container and run it in the cloud
## Intro to Docker
**Docker** is a tool that packages applications and their dependencies into containers, ensuring they run the same way on any system. It's useful because it:
1. **Ensures Consistency** across different environments (e.g., development, testing, production).
2. **Isolates Applications**, preventing conflicts and improving security.
3. **Makes Deployment Easy** by packaging everything needed to run an app in one container.
4. **Increases Efficiency** since containers are lightweight and use less resources compared to traditional virtual machines.
In short, Docker simplifies running and deploying applications by making them portable and consistent.
***
{% hint style="warning" %}
Following requires docker downloaded / docker account. You can skip these steps if you dont have them.
{% endhint %}
## Download sample code
```
git clone https://github.com/sanjeev-one/Intro-to-Supercomputing-24---Duke-IEEE.git
```
The dockerfile tells docker how to setup the container:
````
```dockerfile
# Use the official Python image with version 3.8
FROM python:3.8-slim
# Set the working directory in the container
WORKDIR /app
# Copy the current directory contents into the container at /app
COPY . .
# Install any dependencies specified in requirements.txt
RUN pip install --no-cache-dir -r requirements.txt
# Run ml_app.py when the container launches
CMD ["python", "ml_app.py"]
```
````
### Build and Run the Docker Container
Build the Docker Image:
In a local terminal that has the directory with ml\_app.py open: (This may need logging into docker with docker login and using a [dockerhub](https://hub.docker.com/) account)
```bash
docker build -t ml-app .
```
#### Run the Container Locally:
```bash
docker run ml-app
```
This will print the model's accuracy and the prediction for the sample flower measurements in your terminal.
#### Push to Docker Hub and Deploy on a VM - skip if doing workshop
Log In to Docker Hub: needs
```bash
docker login
```
Tag and Push the Image: (change username to your docker hub account username)
```bash
docker tag ml-app username/ml-app
docker push username/ml-app
```
## On the VM, Pull and Run the Image:
You can follow [Jetstream 2 tutorial](/workshops/jetstream-2-tutorial) to connect to a jetstream 2 vm
1. **Pull the Docker Image**:
```bash
docker pull dukeieee/ml-app
```
This command downloads the Docker image `dukeieee/ml-app` from Docker Hub to your local system or VM. The image contains the Python ML app and its required dependencies.
2. **Run the Docker Container**:
```bash
docker run dukeieee/ml-app
```
This command starts a container using the downloaded image. The app will train a machine learning model on the iris dataset and print the model's accuracy and predictions directly to your terminal.
This approach ensures that the app runs with all necessary dependencies, regardless of the environment, providing a consistent and reproducible setup.
## HPC Specific Variants
### Apptainer
Both Apptainer and Docker are containerization tools, but they have different primary use cases and features:
* **Apptainer**:
* Formerly known as Singularity, it's designed for high-performance computing (HPC) environments.
* Focuses on user-level container management, which does not require root privileges.
* Highly compatible with HPC batch systems and allows seamless integration into shared file systems.
* Emphasizes security, enabling users to securely run containers without additional system privileges.
***
## Running container on TAMU Faster
Authorized ACCESS users can log in using the Web Portal:
{% embed url="" %}
On a login node:
```bash
srun --nodes=1 --ntasks-per-node=4 --mem=30G --time=01:00:00 --pty bash -i
#(wait for job to start)
```
On a compute node:
```bash
cd $SCRATCH
export SINGULARITY_CACHEDIR=$TMPDIR/.singularity
module load WebProxy
singularity pull hello-world.sif docker://hello-world
singularity pull ml-app.sif docker://dukeieee/ml-app
#(wait for download and convert)
exit
```
**Example on Grace, batch job**
Create a file named `singularity_pull.sh`:
```bash
#!/bin/bash
## JOB SPECIFICATIONS
#SBATCH --job-name=singularity_pull #Set the job name to "singularity_pull"
#SBATCH --time=01:00:00 #Set the wall clock limit to 1hr
#SBATCH --nodes=1 #Request 1 node
#SBATCH --ntasks=4 #Request 4 task
#SBATCH --mem=30G #Request 30GB per node
#SBATCH --output=singularity_pull.%j #Send stdout/err to "singularity_pull.[jobID]"
# set up environment for download
cd $SCRATCH
export SINGULARITY_CACHEDIR=$TMPDIR/.singularity
module load WebProxy
# execute download
singularity pull hello-world.sif docker://hello-world
singularity pull ml-app.sif docker://dukeieee/ml-app
```
On a login node,
```bash
sbatch singularity_pull.sh
#wait to complete
```
```
cd $SCRATCH
#see files
```
***
### Interact with container
{% hint style="info" %}
make sure you are on a compute node:\
srun --pty --time=00:30:00 --mem=10G --ntasks=1 bash -i
{% endhint %}
When a container image file is in place at HPRC, it can be used to control your environment for doing computation tasks.
These examples use a container image `almalinux.sif` from , which is a lightweight derivative of the Redhat OS.
#### Shell
The shell command allows you to spawn a new shell within your container and interact with it one command at a time. Don't forget to `exit` when you're done.
```
singularity shell
```
Example:
```
singularity shell ml-app.sif
```
#### Executing commands
The *exec* command allows you to execute a custom command within a container by specifying the image file and the command.
```
singularity exec
```
The command can refer to an executable installed inside the container, or to a script located on a mounted cluster filesystem (see [Files in and outside a container](https://hprc.tamu.edu/kb/Software/Singularity/#files-in-and-outside-a-container)).
Example program installed inside image:
```
singularity exec almalinux.sif bash --version
```
Example executable file `myscript.sh`:
* starts with `#!/usr/bin/env bash`
* has the executable permission set by `chmod u+x myscript.sh`
* is located in the current directory
```
singularity exec almalinux.sif ./myscript.sh
```
#### Running a container
Execute the default [runscript](https://sylabs.io/guides/latest/user-guide/quick_start.html#running-a-container) defined in the container
```
singularity run hello-world.sif
```
```
singularity run --pwd /app ml-app.sif
```
{% hint style="info" %}
\--pwd /app specifies the working directory in the container.
{% endhint %}
{% hint style="info" %}
Want to learn more?
{% endhint %}
# SLURM on Duke Compute Cluster
# Dask on HPC
[Slides](https://docs.google.com/presentation/d/1vU7mJ6W-9cQeHdSDeDG2RSaczJT9MhyEE7hxHfhttZM/edit?slide=id.g1bfac4f1f30_0_365#slide=id.g1bfac4f1f30_0_365), Credit to [Dask Community ](https://github.com/dask/community/issues/9)
### What is [Dask](https://www.dask.org/)?
Dask is a parallel computing library that scales Python code from a single laptop to a cluster. It's useful for:
* Handling **big data** that doesn’t fit in memory.
* Speeding up **Pandas**, **NumPy**, and **scikit-learn** workloads.
* Running **tasks concurrently** using graphs.
***
## Run Locally
### 1. Environment Setup
#### Requirements
* Python 3.8+
* pip / conda
* Git (optional, for cloning examples)
#### Set up a virtual environment (optional, but recommended)
```bash
python -m venv dask-env
source dask-env/bin/activate # For Windows, use: dask-env\Scripts\activate
```
#### 📥 Install Dask (CPU only)
```bash
pip install dask[complete] # includes arrays, dataframes, diagnostics, etc.
```
Or if you're using conda:
```bash
conda install dask distributed -c conda-forge
```
***
### 2. Try Basic Dask Examples
Run these as python files or in a jupyter notebook.
```
pip install jupyterlab
```
```
jupyter lab
```
### Use Dask Dashboard (Optional, Very Useful)
Run your script with the **distributed** scheduler to get the dashboard.
```python
from dask.distributed import Client
client = Client() # Starts a local cluster
print(client.dashboard_link)
```
* Open the printed URL in your browser (e.g. ).
* See live task execution, memory usage, worker status, etc.
####
#### a) Dask DataFrame (Parallel Pandas)
```python
import dask.dataframe as dd
!pip install requests aiohttp
# Load a large CSV in chunks
df = dd.read_csv('https://raw.githubusercontent.com/mwaskom/seaborn-data/master/tips.csv')
# Operations are lazy: nothing happens until compute()
print(df.head()) # Triggers computation
print(df.total_bill.mean().compute()) # Mean of a column
```
#### b) Dask Array (Parallel NumPy)
```python
import dask.array as da
# Create a large array (10000 x 10000) split into 1000x1000 blocks
x = da.random.random((10000, 10000), chunks=(1000, 1000))
# Compute the mean
mean = x.mean()
print(mean.compute()) # Triggers computation
```
#### c) Dask Delayed (Manual Task Graphs)
```python
from dask import delayed
import time
def slow_add(x, y):
time.sleep(1)
return x + y
# Wrap with delayed
a = delayed(slow_add)(1, 2)
b = delayed(slow_add)(3, 4)
c = delayed(slow_add)(a, b)
# Nothing runs until compute
print(c.compute()) # Takes ~3 seconds (runs in parallel)
```
#### d) Speed Comparison
```python
import time
from dask import delayed, compute
# --- Serial Version (Python) ---
def slow_square(x):
time.sleep(0.5) # Simulate work
return x * x
start = time.time()
results = [slow_square(x) for x in range(10)]
total_serial = sum(results)
print("Serial total:", total_serial)
print("Serial time: %.2f seconds" % (time.time() - start))
# --- Dask Parallel Version ---
@delayed
def slow_square_dask(x):
time.sleep(0.5)
return x * x
start = time.time()
tasks = [slow_square_dask(x) for x in range(10)]
total_parallel = delayed(sum)(tasks)
print("Parallel total:", total_parallel.compute())
print("Parallel time: %.2f seconds" % (time.time() - start))
```
***
## Pre made Demos
### 5. Running Example Scripts
Clone the official Dask examples:
```bash
git clone https://github.com/dask/dask-examples.git
cd dask-examples
```
Run an example notebook or script:
```
pip install jupyterlab
```
```
jupyter lab
```
> Look in folders like `dataframe/`, `array/`, `delayed/`, or `distributed/` for ready-to-run demos.
## Running container on TAMU Faster
Authorized ACCESS users can log in using the Web Portal:
{% embed url="" %}
Go to Cluster -> Shell Access
on the shell:
```
cd $SCRATCH
git clone https://github.com/dask/dask-examples/tree/main
```
dask examples docs:\
On the dashboard go -> Interactive Apps -> Jupyter notebook\

***
## Extra conda steups
### Conda Setup for Dask (Recommended)
#### 1. Create a Conda Environment
```bash
bashCopyEditconda create -n dask-env python=3.10 -y
```
#### 2. Activate the Environment
```bash
bashCopyEditconda activate dask-env
```
#### 3. Install Dask (Core + Scheduler)
```bash
bashCopyEditconda install -c conda-forge dask distributed -y
```
#### 4. (Optional) Install Common Dependencies
```bash
bashCopyEditconda install -c conda-forge pandas numpy jupyterlab matplotlib scikit-learn pyarrow fastparquet -y
```
####
***
### Adding custom packages to tamu jupyter notebook:
To create an Anaconda conda environment called my\_notebook (you can name it whatever you like), do the following on the command line:
```
module purge
module load Anaconda3/2022.10
conda create -n my_notebook
```
After your my\_notebook environment is created, you will see output on how to activate and use your my\_notebook environment
```
#
# To activate this environment, use:
# > source activate my_notebook
#
# To deactivate an active environment, use:
# > source deactivate
#
```
Then you need to install notebook and then you can add optional packages to your my\_notebook environment
```
source activate my_notebook
conda install -c conda-forge notebook
conda install -c conda-forge
```
You can use your Anaconda/ environment in the Jupyter Notebook portal app by selecting the Anaconda/ module in the portal app page and providing just the name (without the full path) of your Anaconda/ environment in the "Optional Environment to be activated" box. In the example above, the value to enter is: **my\_notebook**

%20(5)%20(2).png?alt=media&token=4a93b2f9-3cb0-42b7-9023-e790c2560b7c)